Autopsy and Web History Recovery | An Essential Forensic Guide
In digital forensics, recovering a suspect's web browsing history can be crucial for cybercrime investigations or gathering evidence in legal cases. Autopsy, an open-source tool in Kali Linux, provides a step-by-step process to recover and analyze browsing history from disk images. By following specific steps such as creating a case, adding data sources, analyzing web history, recovering deleted browsing history, and generating detailed reports, investigators can uncover incriminating evidence. The tool also supports various browsers like Chrome and Firefox, helping forensic professionals track online activities and build a case. This blog explains the entire process using a practical cybercrime investigation scenario.

Introduction
In digital forensics, recovering a suspect's web browsing history is essential for understanding their online activity, uncovering evidence of cybercrimes, or identifying suspicious behavior. Autopsy, a powerful open-source digital forensics tool, can assist forensic investigators in recovering and analyzing web browsing history from disk images. This process is valuable in various cases, including cybercrime investigations, internal company audits, and gathering evidence for legal proceedings.
In this blog, we'll guide you through the steps of using Autopsy to recover web browsing history from a disk image in Kali Linux, explaining how it works and providing a practical scenario to illustrate the process.
Scenario: Investigating Web Browsing History in a Cybercrime Case
Imagine we're investigating a computer suspected of being used for cybercrime. Our goal is to examine the web browsing history to see if the suspect has visited any illegal websites, such as those involved in illegal file-sharing, hacking forums, or dark web marketplaces.
We have acquired a disk image of the suspect’s hard drive, and we'll use Autopsy in Kali Linux to recover the browsing history and analyze the data. Below are the detailed steps on how to perform this task.
Step 1: Install Autopsy on Kali Linux
Before we begin, we need to ensure that Autopsy is installed on our Kali Linux machine. If it's not already installed, follow these steps:
1. Update Kali Linux
First, open the terminal and run the following commands to update your Kali Linux repositories:
sudo apt update

sudo apt upgrade
2. Install Autopsy
Run the following command to install Autopsy:
sudo apt install autopsy
3. Launch Autopsy
Once installed, launch Autopsy by typing this command in the terminal:
autopsy
This will open Autopsy in your web browser, typically at http://127.0.0.1:9999.
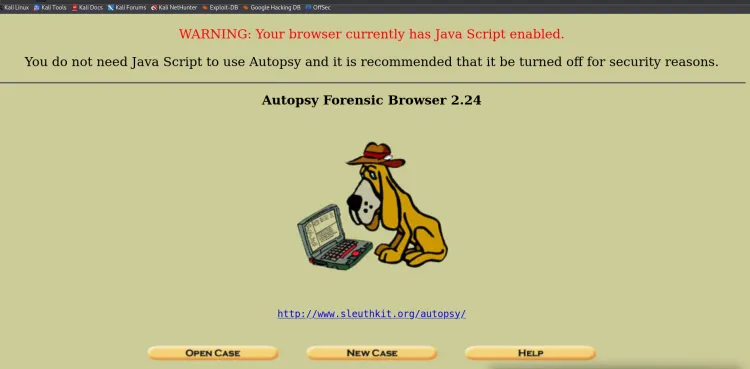
Step 2: Create a New Case
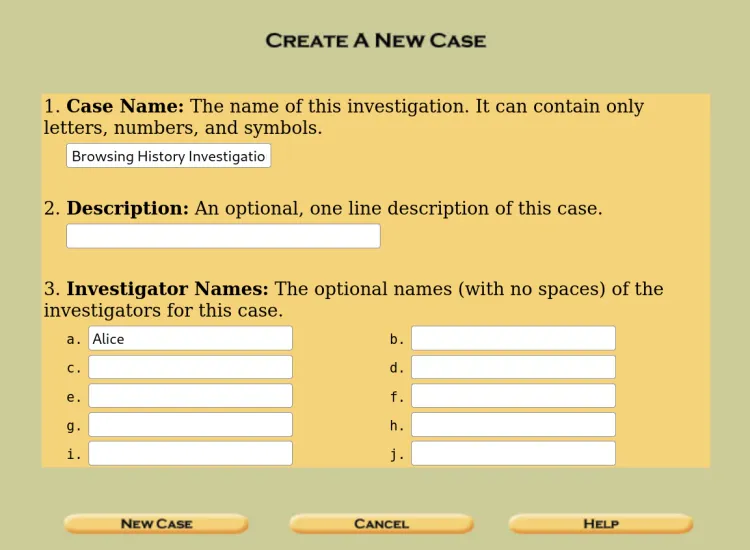
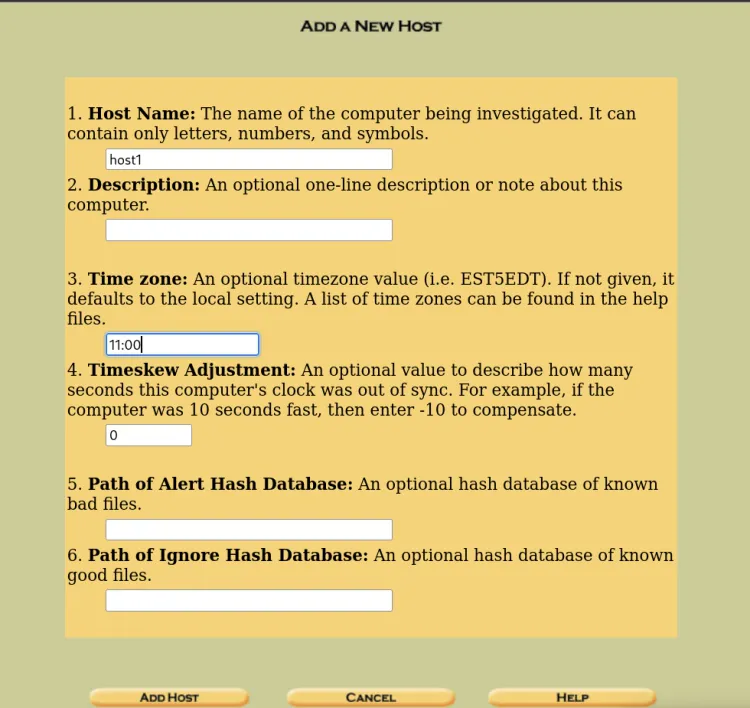
Once Autopsy is up and running, follow these steps to create a new case:
1. Create a Case
- In the Autopsy interface, click on "Create New Case".
- Name the case (e.g., "WebBrowsingHistoryInvestigation").
- Specify a case number (e.g., a police reference number).
- Choose a directory where Autopsy will store the case data.
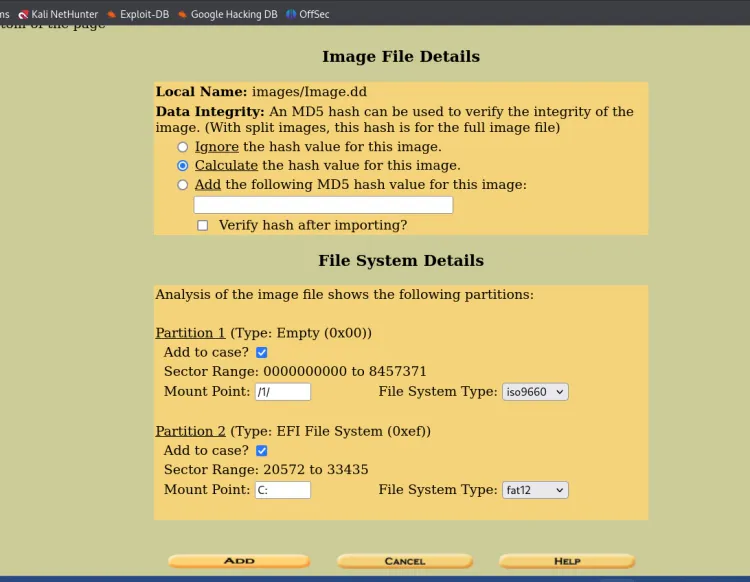
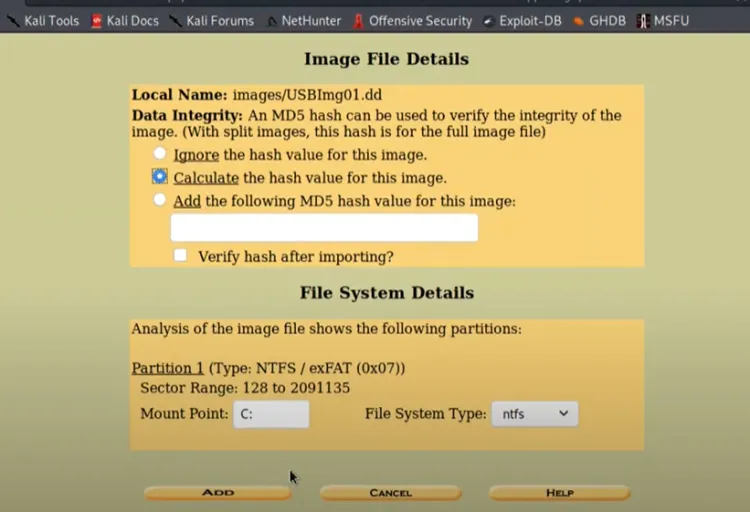
2. Add Data Source
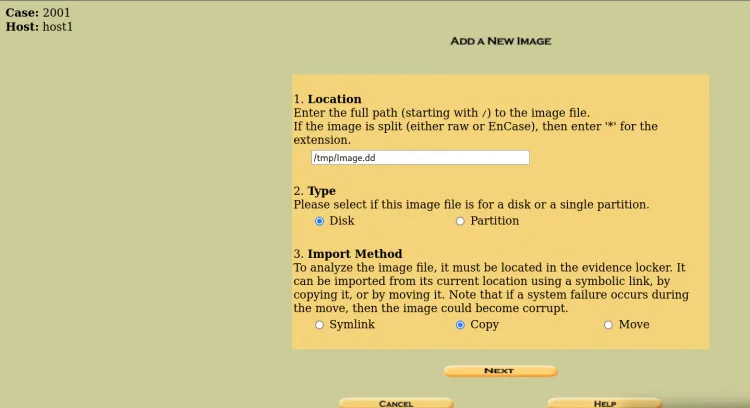
After creating the case, you’ll be prompted to add a data source:
- Choose "Disk Image or VM File" to analyze a disk image.
- Browse to the location of the disk image acquired from the suspect’s machine and select it.
Autopsy will begin processing the disk image, analyzing its contents, and preparing it for in-depth examination.
Step 3: Analyze Web Browsing History
Autopsy includes a specialized module for analyzing web browsing activity. To recover and examine the web browsing history, follow these steps:
1. Navigate to the "Web History" Module
Once the disk image is loaded, go to the "Web History" tab in the Autopsy interface. This section will automatically extract browsing data from popular browsers like Chrome, Firefox, Internet Explorer, and Edge.
2. View Recovered History
Autopsy will display the URLs visited, along with metadata such as timestamps (when the websites were visited) and the corresponding browser (e.g., Chrome, Firefox).
The entries may include:
- URL: The website address the user visited.
- Time: The exact time of the visit.
- Title: The title of the page visited.
- Type of Data: The type of web page (e.g., HTTP, HTTPS).
3. Search for Specific Terms
You can use the search bar in the Web History module to search for keywords related to illegal activity (e.g., "hacking", "torrent", "dark web"). Autopsy will filter the results, making it easier to focus on suspicious behavior.
Step 4: Investigate Specific Web Activity
Now that we have a list of visited URLs, we can perform a deeper investigation into specific sites:
1. Examine Suspicious Websites
If any URLs seem suspicious or potentially illegal (e.g., dark web marketplaces or hacking forums), click on them to view additional details about the web activity. Look for signs of illicit behavior, such as:
- Frequent visits to websites like piracy sites or illicit forums.
- Visits correlating with dates and times related to criminal activity.
2. Check for Suspicious Downloads or Files
Autopsy can also help identify any files downloaded from these sites by correlating web history with file system data. If there are downloads associated with a specific URL, examine the file names and locations for illegal or malicious content.
Step 5: Recover Deleted Web History
Sometimes, the user might attempt to erase their browsing history to hide their tracks. Fortunately, Autopsy can recover deleted browsing history entries. Here's how:
1. Deleted Files and Web History
- Navigate to the "File Analysis" module and select "Deleted Files".
- Autopsy will attempt to recover deleted files from the disk image, including browser history databases or cache files that the user may have deleted.
2. Examine Recovered Deleted Data
Once recovered, examine the deleted files, focusing on browser history files (e.g., places.sqlite for Firefox or History for Chrome). Autopsy may list previously deleted URLs, potentially revealing activities that were erased by the user.
Step 6: Generate a Report
After thoroughly analyzing the web browsing history and recovering relevant evidence, you can generate a report of your findings:
1. Export Data
Autopsy allows you to export web history data in formats like CSV or HTML, making it easy to share the results with law enforcement or other investigators.
To export the data:
- Go to the "Case" tab, select "Export", and choose the desired format (CSV for raw data, HTML for a user-friendly report).
2. Create a Timeline
You can also generate a timeline of web browsing activity, showing the order of visited websites. This can be useful to understand the suspect’s actions over time.
Conclusion
In this blog, we demonstrated how to use Autopsy on Kali Linux to recover and analyze web browsing history from a disk image. By following these steps, investigators can uncover potentially incriminating evidence of online activities, recover deleted browsing data, and generate detailed reports for legal proceedings.
Web browsing history recovery is a critical aspect of digital forensics and can play a significant role in cybercrime investigations, corporate audits, or any case requiring digital evidence. With Autopsy's powerful features and user-friendly interface, performing such investigations becomes efficient and accessible—even for those new to digital forensics.
FAQ:


![Top 10 Ethical Hackers in the World [2025]](https://www.webasha.com/blog/uploads/images/202408/image_100x75_66c2f983c207b.webp)


![[2025] Top 100+ VAPT Interview Questions and Answers](https://www.webasha.com/blog/uploads/images/image_100x75_6512b1e4b64f7.jpg)


